Sunday, November 17, 2013

Drawing: Then and Now

Over the years, my drawing style has changed and improved. I've learned how to draw clothing on after sketching the figure instead of drawing on the legs after drawing a skirt. I've shirked drawing hands by creatively hiding them and avoided feet by having the paper cut them off. I've drawn eyes just like some of my favorite mangas. I've drawn so many drawings that I never finished that I couldn't find ones that I had finished. Now, I'm changing my style and forcing myself to draw hands and feet as well as to make my drawings more realistic. What initiated this change? Mainly the fact that I was tired of my drawings having gigantic anime eyes and wanted to have a more realistic art style. How am I making this change? Well, I'm practicing. I'm taking the time to practice drawing hands in different positions without drawing the rest of the body. I'm adding nails to my hands and drawing more realistic placements of facial features. And I'm picking up drawing books that aren't in the anime/manga style.

While I still enjoy the simplicity of the anime/manga style, I've started to yearn for a more realistic style. Fpr the longest time, I've compared my figure to that of anime characters. They have such long, thin legs and mine are so thick in comparison. Their eyes are so big and elaborate, I wish my eyes could look like that. I've gotten tired of trying to fit my body image onto an anime character with seemingly "perfect" proportions and instead decided to change my art style to fit into more realistic standards. Girls with larger hips and proportionate busts (OK, maybe a bit big) have become more common in my drawings, and it's making me feel better as an artist and a person.

While I still enjoy the look of anime/manga artwork, I just don't feel it's what I want to be my go-to style for drawing anymore. In the long run, I feel that having a more realistic drawing style will bring me more happiness than an unrealistic anime/manga style.

And, yes, here are some of my drawings. (I apologize for the low quality image resolution on some of them. My camera isn't the greatest.)

When I was still fairly new to drawing.
One of my first drawings on a drawing tablet.
One of my more recent drawings. A redrawing of the above character.

Saturday, October 5, 2013

Pet Bunnies: Pros and Cons

About a year ago, my sister decided she wanted a new pet, as she had greatly been missing having a cute, furry little hamster to play with. Originally she had been planning on getting another hamster, but later decided to get a bunny rabbit from a local bunny rescue. As I write this article, I have a sweet little bunny cuddled up on my lap enjoying head pets. We've enjoyed having him in our family greatly, but he can be a little brat at times. In this article, I'll be talking about my personal experience with having a pet bunny around.

So, why get a pet rabbit? For starters, they're small, aren't too hard to take care of, fluffy, and sweet little animals. Our bunny is a very adventurous and smart little guy, making him a lot of fun to be around, but also causing him to be a stinker at times. He adjusted to being around us all fairly quickly after we got him and he behaves differently for each of us. For example, he likes to push his luck with my sister, his mommy, to try and get her to pay more attention to him whereas he tends to be on much better behavior for the rest of the family. Bunnies need a cage that is big enough for necessities such as a box, food and water as well as some room for them to move around in and a higher section they can jump on to. Bunnies also need plenty of time to run around and "shake their sillies out" to keep them healthy and in good shape. My sister and I like to let our bunny run around our room at night before bed, or at an earlier time if we'll be tired at night. We have wire shelf pieces strung together to block off areas we don't want the bunny to get to, such as under our beds as he thinks it's a bunny cave and doesn't like coming out. We also have a harness and a leash so we can let him run around in our yard and nibble on the grass there.

Something to be aware of is that bunnies like chewing on cables. Both my laptop and cell phone chargers have little nibble marks on them from when I wasn't paying close enough attention to him. The worst damage he's done is ruin a charging cable for my sister's laptop by chewing through a decent portion of it. Things like this can be prevented by setting up blockades that prevent the bunny from getting within tasting distance of cables. Also, letting the bunny run around in a room with fewer cables will make it easier to prevent damaged cables. As mentioned above, we have a cage made out of wire shelves set up to keep him at a good distance from cables. We also have a small rug covering cables on the ground. Our bunny sometimes digs at the carpet (or our laps) to point out he's unhappy or just to get our attention. He's never caused any significant amount of damage to the rug, though he has pulled up a strand or two and decided it was grass.

Over all, bunnies are very sweet pets. One of my other friends has a pet rabbit that he spoils with lots of fresh veggies and he loves his little bunny rabbit. He mostly just lets his bunny run around her cage, which is a fairly large cage, so it's not as necessary for her to run outside of her cage as much. Just make sure you have resting pads for your bunny's cage as the wires can hurt their feet if they don't have anywhere else to sit.

Saturday, September 28, 2013

Sulky Thread: A Sewing Nightmare

Recently I decided to turn some fancy fabric I had laying around into a dress, so I had to go get supplies and a pattern to use since I didn't have any fancy dress patterns lying around. Other than a few surprises about the dress pattern that I chose mainly for how pretty it looked ("Wait, this thing needs boning!?") things were going well with the dress making. Until I actually tried sewing it all together. I had bought a pretty, shiny thread to match the fabric I had, but regretted the decision almost instantly. I'd barely sewn three inches on my machine before the bobbin thread broke. Confused, I pulled out the bobbin and checked to make sure the thread hadn't tangled itself up like it so loves to do for me. Nope, thread had just snapped, so I reloaded the bobbin and started again. Three inches later, the bobbin thread had broken again. Frustrated, I pulled the bobbin out again to try to figure out what was going on and why the thread was breaking. Nothing seemed to be wrong, so I reloaded the thread into the bobbin holder. The thread broke as I tried to pull it into place in the metal bobbin holder. I then got very frustrated as I realized the flaw wasn't with the machine, but the overpriced, silky thread I'd bought. I'd been hesitant enough to buy the thread in the first place as I'd forgotten to bring a sample of the fabric to color match with, but now this was making me regret getting the thread at all. In the end, I got frustrated and put the dress aside for a later time when I'd be less frustrated with the whole thing.

Overall, I've found the thread I got, Sulky thread, has been a huge letdown. I've ended up just hand sewing the whole thing since I wanted to finish the dress and don't want to have wasted my time entirely. So let this be a warning to you: Don't buy Sulky thread unless your machine has a plastic bobbin. Which, to my knowledge, is not a real thing. It'll just be easier if you buy a cotton thread instead of wasting your time and money on the shiny Sulky threads.

Good luck with all of your sewing endeavors!

Check me out on Twitter: @animlolicouture

Saturday, September 21, 2013

The Peticoat Debate: My Views

So, as many Lolitas know, there has been an argument raging on the internet over whether Lolita is still Lolita without a petticoat. Obviously there are many different perspectives on this as the Lolita style can be defined many different ways. Here are my personal opinions on what defines Lolita and whether a petticoat is necessary or not.

I've done fairly extensive research on what the Lolita style is as my Senior project was based around the style and also due to personal curiosity. From my research I've seen that the Lolita style is based on Rococo and Victorian styles and that is also a fairly loose fashion. There are many different substyles that break the "rules" of what is thought of as traditional Lolita. While many people insist that having a petticoat to achieve the cupcake shaped skirt is what makes Lolita Lolita, I instead state that it is optional. This is because of what Lolita is: a style based on Victorian and Rococo styles. I admit, poofy skirts were popular in those styles. However, Lolita is very marginally based on these styles. Many of the original Lolita ensembles were petticoat-less. And there are several substyles, including Casual and Punk Lolita, that rarely use or avoid petticoats. Some Lolitas might say these aren't true Lolita styles because they lack the proper shape. I say they are perfectly legitimate Lolita as they have elements of Rococo and Victorian fashion. Very watered down in the case of Punk Lolita, but still there. I've found that many of the "rules" of Lolita are really just suggestions that have been misinterpreted as being rules. It is for this reason that many Lolitas have a very strict image of what Lolita is. Lolita is just like any other style: It changes over time. Does the Punk style (Tthe one Punk Lolita draws from) still look the same today as it did a decade ago? Not entirely. There are still elements, but accessories have changed, the style has become more mainstream, and not everybody really knows what Punk is. Anyways, back to Lolita. I admit that many dresses and jumpers look much cuter with petticoats. However, some dresses look better with no petticoat at all. Not to mention if one wears petticoats all the time it can get quite cumbersome.

Ultimately, I feel the decision on whether or not to wear a petticoat is up to the wearer. If you insist Lolita has to be worn with a petticoat, fine. Just please don't attack the Lolitas that prefer not to wear petticoats all the time. We all love the same style and should be spreading our love of the style, not tearing potential wearers down with all the "rules" of Lolita. So everyone, let's all take a deep breath, relax, and wear Lolita as we choose. がんばってください!Go for it!

Check me out on Twitter: @animlolicouture

Saturday, September 14, 2013

Cosplay: Homemade VS Store bought

For some new cosplayers, the thought of making a costume can seem rather intimidating, especially when one's sewing skills aren't the best. Some of us worry about whether we can finish the costume in time or if we even have a clue about how to start. There's also the fear of spending so much time on something you absolutely love just to have people tell you it's terrible looking. For reasons like this, some cosplayers opt for store bought costumes as they are simpler than making your own and only require money to get. However, many of them are expensive and made with shiny materials, such as sateen or satin, or other materials that do not fit the costume. Some cosplays are also made out of cotton, which isn't a problem by itself, however, the cotton fabric can cause the costume to lack the feel of the costume in the anime, manga, or comic. For example, if you tried to make Catwoman's skin tight bodysuit out of cotton, it wouldn't look the same as using a leather-like stretch fabric. Also, in some cheaper cosplays, details are missed or added that are not in the original character images. For example, the Project Touhou cosplays I recognize on Bodyline are inexpensive, but missing things such as small accessories, bows, and detailing. If you just want to cosplay a specific character and have fun, store bought cosplays can work just fine. However, if you're slightly OCD like me and want to have the details as close to the reference images as possible, homemade cosplay might be the choice for you.

 One of the best things about homemade cosplay is that you have complete control over your cosplay. The only things limiting you are your skills, time, and budget. You can modify the costume to make it more wearable if you choose, or shift the hemline up a few inches to suit your style. Not only that, but you can make your own creations based off of your imagination. Not everyone can say that they not only made their costume, but designed it as well. You can also chose the fabrics and materials you use. Don't like the fact that they used a satin for the top in a Miku cosplay you're looking at? Make your own! Many patterns can be modified or have a part used instead of the whole to achieve the look you want. Several of my homemade cosplays used parts from various patterns I had lying around mixed in with modified patterns I made myself. Nothing's more satisfying in cosplay crafting than butchering up a muslin pattern and having the finished piece look amazing!

I admit, I'm not the best seamstress and have no clue how to make items like weapons, armor, or shoes for cosplay. However, when I make cosplays, I try my best to keep it as close to the original character as possible. For this reason I choose to make my costumes instead of buy them. However, due to my lack of skills in pattern making and sewing, I'm limited in what I can make. This doesn't stop me though as I learn more with each cosplay or dress I make. Many times have I asked my mom, who used to make her own clothes, how to do something while I'm making a cosplay. Sometimes though, I end up relying on my best judgment while creating a costume. Things don't always turn out the way I want them to, but I always learn something new or think of a different way to do something.

Good luck in your cosplay endeavors, whether store bought or homemade!

Check me out on Twitter: @animlolicouture

Saturday, September 7, 2013

Prints in Lolita: Why I Avoid them

Hello everybody! I'd like to discuss my take on prints that tend to be everywhere in Lolita nowadays. Please try not to be offended as this is my personal take on prints. If you love prints, that's fine! We all have different tastes in clothing and how we perceive things. So let's begin!

The main thing that puts me off of prints is that many of them are overdone. They have large pictures of cakes, teddies, and rainbows covering a significant portion of the dress. A good example would be this Conversation Balloons dress. The items in the pattern are large, covering a large portion of the bottom of the skirt. Smaller pieces from the border are scattered along the stripes on the rest of the dress. I personally feel that the larger prints like this stand out too much and add a bit too much of a childish element to the dress, especially when the print is of toys. Many times I feel that the dress is overwhelmed by the large images in the border, especially if they are very different colors from the dress like in the Balloon dress. These prints can look cute in certain colors, but I personally feel that they wouldn't look as good being worn outside of the catalogs. When I was first getting in to Lolita, I used a site that allowed you to design a dress and order it to play around and make "dream" dresses. Many times I chose prints that had a print that blended fairly well with the main color, like this Soft Cream dress. However these dresses were never anything I'd actually buy, just something I thought would look cute at the time I made them. Looking back on the dresses I designed, I still think they're cute, but have no interest in actually buying and wearing them at this point in time. I still appreciate these prints, but find them to be rather loud and cluttered.

However, not all prints are bad in my sights. There's plenty of prints I could see myself wearing that are simple, or small prints. Some examples would be gingham or a print with a small pattern of flowers or fruit on it. I actually own a skirt with a small pattern of flowers on it that I made and enjoy wearing. When I do wear it though, I tend to keep all of the other pieces of my outfit solid colors so that the skirt stands out and the outfit doesn't look cluttered. I've contemplated making a matching blouse with the remaining curtain, but I couldn't see myself wearing it with the matching skirt or even a plain one. Another take on prints I like is a simple line art printed in a contrasting color on a otherwise fairly plain dress. An example is this Moi Meme Moitie JSK which has an elegant print on a simple black JSK. I love Moi Meme Moitie's method of doing prints as they are simple and elegant. One of my original loves when I was new to Lolita was a dress similar to the JSK above with a white print on a black jumper. Even now I still love still love the simplicity and elegance of Mana's designs.

So you may be wondering, what do I wear instead of prints? My answer to that is: solid colors with lace accents. There are many cute dresses out there that use white lace to contrast against a solid colored dress. I have several dresses like this and plan to make another for myself before too long with one of my thrift store finds.

What's your take on prints? Like, love, hate? Let me know in the comments below! Try not to flame or troll please!

Follow me on twitter to support me and get updates! @animlolicouture

Saturday, August 31, 2013

How to Make a Uchiwa fan

 Hey everyone! Today I'll be showing you how to make a cute uchiwa fan. You may remember seeing one in a past tutorial I did and my promise to make a tutorial. Took a lot longer than expected due to sorting and editing the pictures I took after the fact. Here's a picture of my first fan:


Materials:

  • Cardboard box (a cereal box or pancake mix box will work)
  • Attached chopsticks (the ones that are separated won't work)
  • Glue (One that dries clear to avoid mistakes showing)
  • Scissors (regular ones and fabric scissors depending on your covering material)
  • Clips (either binder or clothes ones can work. Wood ones can stick to glue though)
  • Compass (the ones for drawing circles)
  • Ruler
  • Paint, nail polish, or whatever you wish to paint the handle with
  • Cloth, paper, a plastic bag, or whatever you wish to have for the cover of your fan
  • Ribbon or bias tape to cover the edge
  • Decorations (lace, ribbon, rhinestones, charms, etc.)

Let's start off by painting the handle so it has time to dry before we need it. Using paint or a nail polish that goes along with the cover for the fan you're using, paint the chopsticks leaving a bit unpainted at the top so you can hold it while painting (see image below). Let this dry. If you used a matte paint and want the handle to be glossy (recommended to avoid splinters) go over the handle with a clear nail polish after the original paint has dried. Let this dry completely.

Leave room so you don't get paint on yourself!
Yay for creative drying racks!

While the handle is drying, cut along the seam of the cardboard box you're using and open it up (see image below). Determine the size of the box along the shortest part of the front or back of the box. Set your compass to half this measurement and make the largest circle you can.


Now, turn your circle into an oval by shifting the compass over a bit and drawing another curve outside the circle. I recommend using a ruler to make sure the sides are even (see image below).


Cut this out, then place it on the other side of the box. Trace a rough outline using the first oval as a template. cut this rough oval out, then line the other one up with it and cut to match. Once you have the ovals cut out, it's time to start assembling the fan. Start by figuring out how much handle you want showing. I held the handle about where I wanted to hold it when it was done and positioned the cardboard accordingly (see image below). Mark the cardboard at the sides and the top of the handle so you can place it properly later.

Leave a little extra room above  your hand.

Working quickly, spread a thin layer of glue over both cardboard ovals. I used a brush for more even spreading. Place the handle in the outline you marked an spread glue on its other sides. Sandwich the handle between the two cardboard ovals. Place clips on both sides of the handle, on both ends of the oval, and across from the handle to keep everything together. Place clips around the rest of the fan's edge while the glue dries (see image below).


After the glue has dried, remove the clips and do any touch up gluing necessary. Time to cover up the cardboard! Place your fan on top of the material you'll be covering it with and mark an outline slightly bigger than the size of the fan. Cut two of these out and proceed to glue the first side on. Glue it on in sections instead of all at once to make it easier to smooth out the material as you work. Since I used fabric for this fan, I folded over the excess fabric round the edge of the fan. You can skip this step and just trim off the excess if you use an opaque ribbon or trim for the edge of the fan. While waiting for the edge to finish drying, I started playing around with my decorations to determine how I wanted to arrange them (see image below).

Once you decide on the decorations, start gluing them on. If you have multiple layers in one place, glue each layer separately to keep it from getting messed up. Also, be careful when gluing lace and other such fabrics to not let it dry too long or the clip could get glued on too and damage the material when you take it off. Now you're finished!


The finished fan.
You can make all sorts of different sized fans by using larger or smaller boxes. For small fans, use a popsicle stick instead of the chopsticks and cut or break off any excess. Have fun!

My fans thus far.
All pictures were  taken by me unless otherwise noted. Please ask permission if you wish to use them. I'm on Twitter now! @animlolicouture

Saturday, August 24, 2013

Japanese Tableware

A few years back a friend and I were at a Cost Plus World market shopping for some gifts for Christmas when we came across a set of Japanese tableware for two. Since we both had yet to buy a Christmas present for each other, we decided to split the cost of the set and each keep half of it. Since my friend liked the red set the best, I got the black set of the tableware. Both sets came with a plate, a dipping bowl, a rice bowl, a spoon like the ones at Chinese restaurants, a mat, and a set of chopsticks with a holder. All of the pieces have the same characters on them, which I unfortunately can't read at this point since I'm not any good at reading Japanese calligraphy.

The full set


Saturday, August 17, 2013

Steampunk on a Budget

So, Instead of putting together a outfit this time I decided to put together some of my favorite Bodyline items for starting a Steampunk outfit with. Unfortunately, the Victorian styled weapons an other cool trinkets are still your own to find, but with the help of Bodyline you can get a starter outfit and even a pocket watch necklace if you so choose. So, beginning from number one, here are my top 10 starter Steampunk items from Bodyline.

#1 Victorian Dress and Hat

 The thing I love most about these are the very evident Victorian feel they both have to them. I love the design of the sleeves as they allow the contrasting white fabric to show through as well as the lace accents on both the dress and the hat. I like that the dress comes with a matching hat which saves the trouble of fining or making one.

#2 High Collared Blouse

I like the mandarin collar on this blouse as well as the pin tuck and lace details. The frills and details keep it feminine, but it's still a nice, simple look that can easily be worn by itself or under a vest or jacket.

#3 Rose Heart Necklace

I love the delicateness of this necklace as it is intricate yet simple with the shape of the rose and the picot stitching in the outline of the heart. The crystals add anice little bit of sparkle to the necklace as well.

#4 Top Hat

It may just be me, but what's not to love about a nice top hat? Because it's a fairly plain hat, adding on gears, wings, or what have you to match your outfit is easily accomplished without having to work around already present decorations.

#5 Pocket Watch Necklace

Out of all the pocket watch necklaces Bodyline carries, this one is my favorite. I love the roman numerals around the time piece on the outside cover as well as the flower motif on the back. There's a few watches similar to this one, but I like that this one has decoration on the bow as opposed to just a plain one.

#6 Lace-up Boots

I love the style of these boots as they remind me of the button up boots that were more common in Victorian times. The available colors are simple making it easy to get one pair that will work with a host of outfits as opposed to matching the outfit to the shoes. The zipper on the side makes for easier removal and putting on of the shoes.

#7 Layered Corselet Skirt

I like how the layers on this skirt add body without making it overly frilly or cutesy. The high waistline, reminiscent of a corselet or underbust corset in its design, adds a nice, elegant touch to the skirt in my opinion. The main thing I dislike about this skirt is that is only available in black, limiting the range of outfits that could be made with it.

#8 Underbust Corset

I love the lace detailing on this corset as well as the double breasted buttons on the front. Overall I think this is a very elegant and lovely corset.

#9 Knickerbockers

These are some nice trousers for female or male Steampunk wearers that are elegant and simple. They appear to have pockets, which can be handy for hiding cell phones and other items that are necessary, but not Steampunk.

#10 Ruffled Blouse

This is a nice blouse with a jabot and sleeves that can be worn either short or long, depending on the weather. I like the lace accents on the blouse as it adds more elegance to it.

And that concludes my list of the top 10 Steampunk items available on Bodyline. Feel free to leave comments below saying what your favorite item is from this list or what you think of the various items. I'm on twitter now! @animlolicouture

Saturday, August 10, 2013

The Never Ending Anime Series

Hey guys! Today's article might be a bit of a rant, so I apologize in advance. I will, however, make sure it does not become a 20 page essay on every little thing I dislike about anime. So without further ado, here's my personal perspective on never ending anime series.

There's many different animes out there, some aimed at teen girls, some at old creaky men. Whatever the target group, there's a reoccurring theme in many of them: The series that will never die, or, if it does, will start a new series with the same characters and a different title. Some that may pop into your mind that are very mainstream are Naruto and Naruto: Shippuden and Bleach. I actually used to enjoy Bleach when I first discovered it. I started out watching the anime, but, due to various circumstances, ended up reading the manga instead. At the time it was already a fairly mainstream anime/manga series and had quite a few episodes and chapters out. So why did I stop reading it? One of the things that bugs me the most about a lot of manga series is that you tend to have to wait a month between chapters (once you're up to date), meaning you can forget what's going on and be totally lost when you pick it up again if you don't check every month. Even then, it's hard to remember with everything else in life. For this reason I tend to go for finished series that I already know I like and just buy them so I don't have to wait to see if all of the chapters are up on a site or if they stopped updating because the manga was licensed. However, forgetting the story line is only part of the problem. Many times a manga-ka will stretch out scenes in a particular section of the story just to have more chapters. I admit it can be necessary, but it gets tiring after a while. 'Chapter 283: still on the same battle as chapters 275-282, inclusive.' Drawn out battles tend to happen when the manga-ka decides to give such-and-so a character a back story so you know WHY they hate the protagonist. Other than like, they just hate their guts. It's things like this that make me opt for shorter, completed series rather than long, continuing series.

However, not all long anime series are as bad to me as some. There's several series I still enjoy reading despite the fact that they rarely update and tend to be long. Why's this? It's because of the way they're written. Many animes and mangas merge episode into episode, chapter into chapter, aking for one, long, continuous story that ends in a cliff hanger every time. This is the same sort of thing that happens in a good book. You keep meaning to put it down and go to sleep, but the chapters pull you onwards, making you keep reading until you finish the book and realize you need to get up in five minutes. I have nothing against this type of writing, but when the book never ends and has odd breaks and pauses in it that are unnecessary, it becomes tiring. For this reason I tend to choose mangas and animes that are finished series. However, the ongoing series that I tend to read and watch have a different format from most. They are more episodic in nature, having a short standalone story that can stand by itself, but adds on to the overall story that is being told. This format is used in many American shows such as Castle and the Simpsons or like a series of books. There's a story in each episode or book that is full and complete, but there's an overall story that can be put together from one episode or book to the next. There's rarely any "To Be Continued..." and when there is it's to keep the story from being shortened down to a point where it's not as meaningful. Animes and mangas that follow this format tend to be more to the point and not drag things out as much as many commonly known ones.

Please feel free to comment below about your perspective on the never ending anime series, but please don't start fights or flame or your comments will be deleted. If you have an anime or manga you'd like me to check out and review, please comment below and I'll check it out when I have the opportunity. I'm on Twitter now! @animlolicouture

Saturday, August 3, 2013

My Pocelain Doll Collection

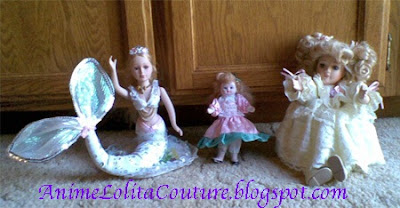
Over the years my love for porcelain dolls hasn't faded. As a child, they were a beautiful, delicate thing that I rarely was allowed to play with since I wasn't especially gentle as a child. I've always been enraptured by how elegant they are and have always wished that I could dress as elegantly as them. Currently my collection consists of three dolls, two of which I was given as a child and the third I got a few years back as I was visiting my grandparents.

My Porcelain Dolls

The first doll I got was given to me when I was very small by a family member. My parents wished to keep her in good condition until I was old enough to appreciate her, so she was kept in our attic for quite a few years. She is very cute and has blond hair just like me, and I love her frilly white dress. My favorite part about this doll is that you can wind her up and have her play a little tune that she sways to. I've always loved listening to the tune she plays, so it's a fortunate that I haven't broken her sound box by winding her up too much!


The second porcelain doll I got was a gift from one of my teachers at church. It was so long ago that I don't really remember why she gave me the doll, but I think it might have been because of my hair color. Ever since I was little I've let my hair grow out and all of the older ladies at church always complemented me on my hair. So I believe this doll was given to me since her hair appeared similar to mine, which has red and strawberry tones in it as well blond. I've always loved the dress on this doll as it is very cute and delicate. The fabric on her dress has a silk-like texture to it and she has an adorable pair of bloomers on as well.


My most recent addition to my porcelain doll collection is a pretty mermaid who's hair matches mine. I got her as a gift from my grandparents when I visited them several years back. I chose her because she was the most similar in appearance to me out of all of the other mermaids that were at the store. Ever since I was a little girl I've loved mermaids as well as swimming, so my parents used to call me a little mermaid, so in a way this doll lives out my dream of becoming a mermaid. I love that there are little bits of underwater foliage as well as a little fish shaped bead on the cushion she sits on as well as her shell necklace and her tiara.


All pictures were taken by me unless otherwise noted. Check me out on Twitter.

Saturday, July 27, 2013

Cosplay on a Budget: Using What You Have

Welcome to another cosplay on a budget article! I apologize for the long gap in between articles. I've been getting a lot of Lolita inspiration lately and not so much cosplay. Now without further ado, here's

Using What You Have

 When I first started cosplaying, I didn't have the money to buy pre-made cosplays nor to afford the fabric and other materials to make my own. And wigs? The only ones I had were cheap Halloween wigs, which don't last long and tend to look rather crummy. As such, I had to be creative and make my cosplays out of whatever I had lying around. As I mentioned in my article about my first convention experience, my costumes were both made with clothing and notions I had lying around. Granted, not everybody keeps scraps of fabric, old clothes that are too small or too worn to wear, and random pieces of lace around their house. But if you're a bit of a pack rat like me, you should have no problem. Even if you aren't you can easily find ways of turning your everyday clothes into a cosplay. So, here's part one of this article:

Make a Cosplay with Materials at Hand

You won't get the best costumes this way, but they'll be recognizable. First, pick out several characters with a hair color and style similar to yours. This will save you the grief of dying your hair temporarily or wrangling with a cheap wig. They can be characters you recognize, characters you like, or even characters you don't much care for. As long as you wouldn't be terrible against cosplaying a character, add them to your list. Now, look at the characters costumes. Would you be willing to wear that or a slightly modified, but still recognizable version of it? If no, take that character off of your list. Also keep in mind that some characters have multiple outfits, some more recognizable than others. If you wouldn't cosplay one of the character's outfits, check to see if there's others. Next step, take a look at all of the detailing and pieces of the outfit. Would you be able to simplify the details and still have the outfit be recognizable? Would you be able to make the various pieces of the outfit with what you have? Once you know the answers to these questions, choose an appropriate character and start putting together their outfit. Is the character wearing shorts? You can easily turn an old pair of jeans into shorts by cutting them slightly longer than you want them and either hemming or distressing the edges. Need a tube top or other tight fitting shirt? Cut off the legs from and old pair of stretchy pajama pants and add sleeves, collars, etc. as needed. Just make sure to cut edges longer than you need them if you plan to hem them and cut head/arm holes smaller than you want them to leave room for mistakes.

Make a Cosplay with Clothes you Already Own

 For this method you'll want to go through the same process as above for choosing a character, but you'll want to look for a character with clothing that could easily be found in your closet. If you already have school girl clothes in your closet, look for a school girl character. My Misa Amane cosplay consisted of a frilly black dress and jacket I'd bought at a previous date combined with some black tights, heels, a black ribbon worn as a choker, and my customized dog tags. This and my hair and makeup done appropriately were enough to get the character across. I'd also used the same dress and jacket for a Freya (Chobits) cosplay a few years earlier. So go look in your closet. Think of what characters you could cosplay as with what you've got in there and you'll have pieced together a cosplay before you know it.

As I mentioned earlier, I've used there methods in the past. Here's a good example of a cosplay I put together the night before a con with some help from a friend. A few cons previously, my friend had cosplayed Liz Thompson from Soul Eater and I'd decided I wanted to cosplay the same character for this con. I had the pants and shoes, but that was about it. My friend lent me the hat she'd made using a couple of blue folders, glue, an old shirt sleeve, and dental floss. Then came the problem of the shirt. It was a red, sleeveless cropped turtleneck which presented several problems to me. The first was that I didn't really have any red shirts, much less sleeveless turtlenecks. Also, I wasn't especially comfortable with the idea of bare shoulders and midriff. What was I to do? Well, my creative friend pulled out an old pair of red, stretchy pajama pants and suggested the idea of making them into a shirt for me. We cut off one of the legs, made armholes in it and hemmed the bottom, then turned the other leg into sleeves and a undershirt thing so I wouldn't have to worry about anything showing that I didn't want too. I've since gotten a better shirt for this particular cosplay, but the one my friend made worked and got the point across well enough. (My friend's outfit for the con was thrown together last minute as well, but I've cut out details on it's creation for space's sake.)

My old Liz cosplay shirt and hat

Saturday, July 20, 2013

Lolita on a Budget: Classic Lolita

For some of us, we love the Lolita style, but just can't see ourselves in all of those frills, cupcakes, and bows. But what can a girl do if she's still interested in wearing Lolita? The answer is Classic Lolita which makes use of darker colors and A-line dresses to achieve a look that's more mature, but still Lolita. This look is also good for Lolitas that are getting older and realizing that their suggary rainbows and pony print dress is a little too over the top for them. This is a simple look that can be achieved with a few pieces from Bodyline! as well as some other items. The total price for the Bodyline! elements of this outfit is $127 plus shipping and handling. Here we go!

The main part of this look is an elegant floral print dress available in multiple colors to match with how you look. If you look good in deep jewel colors, the maroon dress is the one that would best suit you. But if you look better in natural colors, like tans and browns, the brown dress is the best one for you. The bright red dress would be best worn if you look good in bright colors. For the shoes, a more classical look is better as rounder toes have a more youthful look to them. These pumps are still cute, but also more mature with a slightly lower heel and a more pointed toe as opposed to the majority of Lolita heels offered. The last item from Bodyline! for this look is a simple off white headband with pearl and rose accents. As an alternative, one can wear a simple flower hair accessory in a natural color or a fresh rose if you have access to one (watch out for those thorns! be sure to remove them before putting the flower in your hair). To finish this look off, wear a pair of opaque off white tights and some off white pearl accessories such as a layered choker and bracelet. Try not to go over the top with accessories with this style of Lolita. You want to look mature and put together for this look, not drowning in a sea of plastic beads and pink kittens. Not that there's anything wrong with that as long as the rest of your outfit fits in with them. I hope you enjoy this look!

All of the items in this outfit plus more in this style can be found on the Bodyline website. No pictures due to the fact that I haven't received permission to use Bodyline!'s images. Check me out on Twitter.

Saturday, July 13, 2013

Decorate a Mini Notebook (Or Any Notebook)

 Please be warned: this article has multiple images and may take a while to load fully for slower connections. I recommend stopping the page from loading once the text is visible and then individually loading the images as you get to them.

A little while back, my mom found some nice little notebooks at a crafts store and offered me one. When I first got it, I saw that it was a very plain little notebook, obviously intended to be decorated. Here's a tutorial on how I decorated my notebook. This can also be done with a full sized notebook as well if you want.

Materials:
  • Notebook to decorate
  • Colorful/patterned paper
  • Glue
  • Scissors
  • Decorations such as metallic tape or rhinestones


Start by cutting out pieces from the paper that are large enough to cover the notebook covers with a bit of excess on each edge (see image below).


After cutting out the paper, glue it to the covers and trim off the excess. If your notebook is spiral bound like mine, trim the paper as close to the binding as possible, or place the paper close to the binding while gluing it on. Make sure the glue is spread evenly over the notebook surface so you don't have any bumps. I use either the tip of the glue bottle or a cheap plastic paintbrush to spread the glue around. Make sure to wipe off any excess glue before it dries.

This next step is optional for if you use a notebook with a spiral binding. Cut a rectangle of paper big enough to cover the spiral binding and overlap slightly over the paper with the part of the cover with paper on it (see image below).


Glue this in place at the edges where it overlaps. Don't glue too close to the binding since you still want to be able to open the notebook fully and flip the cover under if needed. To cover the seam between the two pieces of paper, I used a strip of metallic tape (see image below right). Make sure to measure out how much tape you'll need before cutting it and add a bit of extra tape to make sure it's not too short. You can always trim off excess tape.


Tape in place.
Measuring out the metallic tape.


Now you can decorate your notebook however you want! I used some glitter to make a little heart on the front as well as a few rhinestones, but you can do whatever you want. You can also do things like overlapping pieces of paper or even fabric if you have a larger notebook. I would have with mine, but it's so small! I still like how it turned out though. ♥


All pictures were taken by me unless otherwise noted. Please ask me for permission if you wish to use any of them. I'm on Twitter now! @animlolicouture

Saturday, July 6, 2013

Home Made Hello Kitty Skirt

A while back I made a cute pair of Hello Kitty Pajama Pants out of some left over Hello Kitty fabric I had. I still had a good amount left, so I originally planning on making a matching pajama shirt, but I decided I'd rather have something I could wear outside. So I made a cute ruffled skirt for myself using the leftover fabric and an old elastic waistband I'd saved off of another skirt. Like with my ruffled petticoat, I used a pattern plan instead of a paper pattern. I made this skirt similarly, but with only two layers and different width sections. The fabric was about 45 inches wide, so I cut three sections 6.5 inches long at the full width of the fabric for the lower portion. The top section was made out of three sections about 20 or so inches wide as I was running out of fabric. I assembled the sections in the same way as I did on the petticoat, but attaching the elastic waistband was rather difficult and different. I started by stretching out the waistband so that it matched up with the top edge of the skirt. I then pinned the skirt to the waistband every couple of inches with the help of a friend. while sewing the waistband on, I started at one of the pins, then stretched out the waistband between that one and the next pin so that the fabric wasn't gathered at all. I discovered that the elastic was strong enough to pull the fabric the wrong way through the machine if I didn't pull it through as I went. Here's how the finished skirt looks:


It ended up a little shorter than I would have liked, but I can easily wear a pair of leggings underneath to prevent any problems.

All pictures were taken by me unless otherwise noted. I'm on Twitter now: @animlolicouture

Saturday, June 29, 2013

My First Convention Experience

So, even though I've been going to conventions for a few years now, I thought it'd be nice to write about my first time ever going to a convention. It was a fairly small Anime convention not especially far from where I lived (from my perspective at least). When I first started going to anime conventions, I wasn't very much into anime. Sure I'd seen some anime episodes and read some mangas, but I wasn't totally banzai fangirl over it. I'd never really dressed up in costume outside of Halloween and dance performances that I'd been doing for a major part of my life at that point. Maybe it was because of my dance career, but I felt that it was necessary to dress up for the convention, even if it wasn't cosplay. I appreciate that not everybody feels comfortable wearing costumes outside of Halloween, so I've never felt the need to force everyone to dress up for conventions. I personally just feel it makes it more fun.

Another thing that I've done since I started attending conventions is wear different outfits every day that I go to the con. In previous years I've gone so far as to wear two to three different costumes in a day. My fist time going to a convention wasn't quite that elaborate though. I went to the con two different days, so I wore two different outfits. The first one was a cute China dress I'd gotten to wear for a birthday party a few years prior along with a sash and a shirt underneath. The second day I wore a Lolita-like outfit I'd put together. It consisted of a black A-line skirt I'd hemmed to knee length, a white polo shirt, some lace and roses I had lying around, some quickly made wrist cuffs, and a cute teddy bear that I had wearing a Gothic Lolita like dress. (The bear can be seen modeling my Mini Cherry Tophat here.) Unfortunately, I don't know where any pictures of either of my outfits are at this point in time, but I'll be sure to post them when I get the chance.

As you can probably guess, I didn't really get any compliments on my outfits, no one recognized me from such and so an anime, but I didn't mind. I enjoyed seeing everyone else's cosplays and outfits and had fun despite my lack of experience cosplaying. So this is to anyone who's never been to a convention before and is unsure if they have to dress up: Do whatever you want. If you feel comfortable dressing up in a costume in public, go for it. If not, don't worry. There's plenty of people who wear a anime themed T-shirt or a colorful wig and call it good. There's nothing wrong with that. There's also plenty of low quality cosplays. You don't have to look like Yaya Han to have fun cosplaying, just go for it and have fun. Have fun at any future conventions you choose to attend, Anime, Sci-fi, fantasy, or what have you and don't feel like you have to have an amazing costume to have fun.

I'm on Twitter now!@animlolicouture

Saturday, June 22, 2013

Lolita on a Budjet: Hime Lolita

Who doesn't want to be a princess at some point in their life? As girls, many of us dream of being a princess and with Hime, or Princess Lolita we can make dreams reality! Hime Lolita is definitely a extravagant style, so it can be fun to wear on occasions when one feels like going the extra mile to look glamorous. Perfect princess hair and makeup is only part of the look, and here I'll show you an affordable Hime Lolita look using items from Bodyline! This outfit costs $114 to $167 plus shipping and handling.

The base of a Hime Lolita look is always an elaborate dress. I feel that this pink flared sleeve dress is perfect for the Hime style and it's got the added benefit of removable sleeves, making it so you can wear it as a Sweet Lolita dress as well. And what outfit is complete without a great pair of shoes to go with it? These ribboned heels are pretty and cute and give you an extra boost of height for that added confidence as you stroll along. I felt that a pair of lacy tights would work best with this look and was pleased to find that Bodyline! offers cute bow patterned tights. For that extra touch of glam, a pair of pink lace and bow nails is just the perfect touch. And for icing on the cupcake, put on a cute flower headpiece that is elegant and cute. Or you can glam it up and get a tiara, which unfortunately can't be gotten from Bodyline!, but can be easily found at stores around Prom season. Not everybody has perfect Hime Lolita hair or the time to do their hair up, so if that's you you can also get a Hime wig from Bodyline! in just about any color you want! I hope you enjoy this Hime Lolita outfit.

All of the items in this outfit plus more in this style can be found on the Bodyline website. No pictures due to the fact that I haven't received permission to use Bodyline!'s images. Check me out on Twitter.

Saturday, June 8, 2013

Wood Shop Jewelry Box

Back in high school I had the opportunity to take a wood shop class where I learned how to make objects out of wood. I had several projects including a birdhouse and a cutting board, both of which I gave to relatives, as well as a jewelry box. The Woods I chose to use are cherry wood and walnut, both of which are my favorite dark colored woods. The other kids in my class used a small dowel for a hinge on their boxes, but my lid was cut too thin, so I salvaged some hinges off of another jewelry box I had that I didn't care for. I found out that brass screws are very soft and so they are hard to get into a hard wood without damaging. Fortunately, I positioned the hinges on the inside of the box, so you can't see that the heads of the screws are a little messy looking from the outside of the box.


All pictures are by me unless otherwise noted. Check me out on Twitter.

Saturday, June 1, 2013

DIY Clay Decodens

Recently I've been getting interested in Decoden, cute little items such as kitty faces and cupcakes or other food or kawaii related items. Since these items tend to be rather expensive and a little difficult to find, I decided to try making my own with some colored clay I had. I started by making cherries, then moved on to cookies and macaroons as well as frosting and whipped cream. The cherries turned out alright, but my favorite items are the frosted star cookie I made and the macaroons. For all of the cookies I mixed some pale yellow clay with a bit of brown clay to get a color similar to other decoden cookies I've seen. For the frosting I mixed small pieces of colored clay and some white liquid clay together until the solid clay was mostly broken up, then drizzled it on the cookie. I attempted the same thing to make frosting, just adding more solid clay, but it didn't turn out especially well. This could be because I was using a oven bake clay instead of a self hardening clay like most home made decoden are made out of. It's also possible I didn't add enough solid clay to make a good mixture since I was getting rather tired of breaking up and mixing the clay. Anyways, here's a picture of the decoden I made minus the whipped cream which was added afterwords.


The larger macaroon is in half still because I put whipped cream in the middle after the initial baking. Sorry for the low image quality; I'll try to get better pictures of the items up later. All images were taken by me unless otherwise noted. Check me out on Twitter.

Saturday, May 25, 2013

Japanese Dolls and Geishas

Here's another one of my collections, this time featuring my items with traditionally garbed Japanese women. I have a statue, a doll, and a note pad in this collection (see below).


The statue features a lady wearing a kimono doing a traditional Japanese art: Ikebana or flower arranging. I like how delicate this statue is and how it mostly uses soft colors that all blend nicely together.


The next item is the doll. I believe that this doll is a highly simplified version of the Hinamatsuri, Japanese girl's day, Ohime-sama doll as it is in a similar style to other Hinamatsuri dolls and has a tiny fan, like the full sized versions of Ohime-sama have. I love how simple and small this doll is while still being very elegant and detailed.


The last item in this collection is the note pad. It's a very pretty note pad with a geisha featured on the front. The paper inside has a nice delicate pattern using different shades of purple. The outside has lot of metallic gold accents, making it very difficult to get a good image of the cover.


All images are by me unless otherwise noted. Check me out on Twitter.

Saturday, May 18, 2013

Lolita on a Budjet: Gothic Lolita

 Gothic Lolita is the first Lolita style I tried and today is one of my favorites.The one thing I dislike about Gothic Lolita is that it lacks bright colors, so I enjoy wearing other styles of Lolita as well. For this Gothic Lolita outfit I chose to do an outfit that's mainly black with white accents to keep the outfit from looking too dark. For those that prefer an all black Gothic or Kuro Lolita, I'll do an outfit later on for that style. This outfit costs $120 plus shipping and handling. Let's go!

The most important part of any Lolita ensemble is, of course, the dress or, in this case the jumper. For this outfit I chose a ruffled jumper that comes with a matching katayusha, or head bow. I love that this jumper's cute yet inexpensive and that it comes with a head bow as well making for even more savings. For a blouse to wear under the jumper, I felt that the ladder race blouse in white would be the best since it allows one to wear the sleeves long or short making it a very versatile blouse. Since it's a white blouse it can also be used with many ensembles or by itself with a pair of jeans if you want a casual but cute look for every day wear. I thought that over the knee socks would look best with this look, but a cute pair of lacy white tights could be substituted for a more mature look or to keep your legs warm in winter. I love how cute all of Bodyline's shoes are and these are no exception! The triple bow shoes in black are very cute and I love the little heart shaped clasps on them. To top it all off, I thought that adding a few cute rings would be nice. My favorite ones are the black crystal rose and bow rings. Now add a petticoat and a pair of bloomers and you're good to go! I hope you enjoy this look and look forward to more in the future! Bodyline! is always adding new items, so there's sure to be more looks in this and other styles in the future.

All of the items in this outfit plus more in this style can be found on the Bodyline website. No pictures due to the fact that I haven't received permission to use Bodyline!'s images. Check me out on Twitter.

Saturday, May 11, 2013

Gothic & Lolita Kodona Blouse

A while back I got a blouse pattern from Miss Carlyfornia out of a Gothic & Lolita Bible she owns. The blouse was part of a Kodona Lolita (Boy style) ensemble that included a frill, ribbon, and belts for the sleeves of the blouse as well as a pair of shorts. Seeing as how I barely fit extra large Japanese size blouses, I doubted I'd fit the shorts pattern so I only copied the blouse pattern. A little while back I took the time to actually make the blouse that was in the instructions since I'd only used the bodice of the blouse to make a puff sleeved sailor collar blouse. This time I altered the pattern to make it slightly longer as well as making the modifications called for in the pattern to give the blouse tails and enough space in the front to make it a button up blouse. Fortunately the alterations all turned out well and I was able to assemble the pattern fairly easily. My main struggles were with the sleeves, as they were in three different sections and I'd sized the middle section a little off, and the collar, which was a style I'd never done before. The buttons were also a little difficult making sure that they were positioned properly, but the part that brought me the most grief was the button holes. This is mainly because I'd never done button holes on a sewing machine before, but also due to the fact that the pieces for button holes decided to stop working for no evident reason partway through several of the button holes. Overall, the blouse turned out really nicely and it fits very well.


I'm wearing my new blouse with a ribbon at the collar and my loliable skirt in the image above. The blouse also works really nicely with my Gothic Lolita Pinafore by Miss Carlyfornia.

All images are by me unless otherwise noted. Check me out on Twitter.

Saturday, May 4, 2013

Metallic Nail Art Tutorial

Please be warned that this post has quite a few images in it. If you have a slow internet connection I suggest you stop the page loading once you can see the text, then load the pictures individually as you come to them.

Time for another  tutorial, this time for nails. This look was inspired by Michelle Phan's Metallic Knight makeup tutorial. Let's get started!

What you'll need:
A sparkly nail polish as well as a base and top coat
Metallic tape in silver or a silver metallic pen (You can find the metallic tape at a crafts store and the pen at an office supply store)
Rhinestones (Tiny ones work best)


First off, you'll want to start with clean nails without any rough edges. I filed my nails so that they're rounded, but you can also do this with squared off nails. You can also use fake nails as this would make application of the decorations a bit easier. Start by applying a base coat on your nails. This helps the polish last longer.


Now apply a sparkly colored nail polish, one coat if it's more opaque or two to three if it's a more translucent polish like mine. I used a jade colored polish here, but you could also use any other jewel tone. I recommend against using a gold or silver polish as this will make the stripes we will be putting on next not show up as well.


Now start cutting off pieces of the metallic tape that are a bit longer than your nail at the angle you wish to place the stripes at. Cut these pieces into thin strips (see image below) and then cut them to fit comfortably on your nail. I found that cutting the ends at angles made the strips fit better on my nails. Be careful while you cut out the strips. The tape had a tendency to slip off of its backing on one side of the scissors while I was cutting mine.


 Arrange the strips of metallic tape and rhinestones on your nails in a striped pattern. Make sure to leave the backings on the tape until you know how you want them to look (see top image below). To attach the metallic tape, just remove the backing and press onto the nails. It helps if you have a layer of polish on that's not quite dry yet so the tape will stick a bit better. Put a dot of polish anywhere you want to put a rhinestone and apply them with a pair of tweezers or with your fingers if you want (see bottom image below). Push the rhinestones into the positions you want them in if you haven't placed them quite right.

Arranging the metallic strips


Adding rhinestones

 Keep repeating this pattern for all of your nails. I decided to only do every other nail with the tape on it and I only did rhinestones on two nails per hand. Mix things up and do a different arrangement on each nail, but it looks best if you keep the metallic tape strips in the same general pattern with the stripes running in the same direction (see image below).

All the stripes run in the same direction.


Make sure to cover everything with a clear topcoat to help it stay on better once you're done. Here's the finished result!


I mentioned above that you can also use a metallic pen in place of the tape, so here's an image with the finished nails using a metallic pen. The metallic pen isn't quite the same effect as the metallic tape, but it still looks nice. If you have a nail art brush you could also use a silver nail polish to paint on the stripes.


I hope you enjoy trying out this tutorial! Michelle Phan's tutorials can be found on YouTube. All images are by me unless otherwise noted. Check me out on Twitter.