Saturday, August 31, 2013

How to Make a Uchiwa fan

 Hey everyone! Today I'll be showing you how to make a cute uchiwa fan. You may remember seeing one in a past tutorial I did and my promise to make a tutorial. Took a lot longer than expected due to sorting and editing the pictures I took after the fact. Here's a picture of my first fan:


Materials:

  • Cardboard box (a cereal box or pancake mix box will work)
  • Attached chopsticks (the ones that are separated won't work)
  • Glue (One that dries clear to avoid mistakes showing)
  • Scissors (regular ones and fabric scissors depending on your covering material)
  • Clips (either binder or clothes ones can work. Wood ones can stick to glue though)
  • Compass (the ones for drawing circles)
  • Ruler
  • Paint, nail polish, or whatever you wish to paint the handle with
  • Cloth, paper, a plastic bag, or whatever you wish to have for the cover of your fan
  • Ribbon or bias tape to cover the edge
  • Decorations (lace, ribbon, rhinestones, charms, etc.)

Let's start off by painting the handle so it has time to dry before we need it. Using paint or a nail polish that goes along with the cover for the fan you're using, paint the chopsticks leaving a bit unpainted at the top so you can hold it while painting (see image below). Let this dry. If you used a matte paint and want the handle to be glossy (recommended to avoid splinters) go over the handle with a clear nail polish after the original paint has dried. Let this dry completely.

Leave room so you don't get paint on yourself!
Yay for creative drying racks!

While the handle is drying, cut along the seam of the cardboard box you're using and open it up (see image below). Determine the size of the box along the shortest part of the front or back of the box. Set your compass to half this measurement and make the largest circle you can.


Now, turn your circle into an oval by shifting the compass over a bit and drawing another curve outside the circle. I recommend using a ruler to make sure the sides are even (see image below).


Cut this out, then place it on the other side of the box. Trace a rough outline using the first oval as a template. cut this rough oval out, then line the other one up with it and cut to match. Once you have the ovals cut out, it's time to start assembling the fan. Start by figuring out how much handle you want showing. I held the handle about where I wanted to hold it when it was done and positioned the cardboard accordingly (see image below). Mark the cardboard at the sides and the top of the handle so you can place it properly later.

Leave a little extra room above  your hand.

Working quickly, spread a thin layer of glue over both cardboard ovals. I used a brush for more even spreading. Place the handle in the outline you marked an spread glue on its other sides. Sandwich the handle between the two cardboard ovals. Place clips on both sides of the handle, on both ends of the oval, and across from the handle to keep everything together. Place clips around the rest of the fan's edge while the glue dries (see image below).


After the glue has dried, remove the clips and do any touch up gluing necessary. Time to cover up the cardboard! Place your fan on top of the material you'll be covering it with and mark an outline slightly bigger than the size of the fan. Cut two of these out and proceed to glue the first side on. Glue it on in sections instead of all at once to make it easier to smooth out the material as you work. Since I used fabric for this fan, I folded over the excess fabric round the edge of the fan. You can skip this step and just trim off the excess if you use an opaque ribbon or trim for the edge of the fan. While waiting for the edge to finish drying, I started playing around with my decorations to determine how I wanted to arrange them (see image below).

Once you decide on the decorations, start gluing them on. If you have multiple layers in one place, glue each layer separately to keep it from getting messed up. Also, be careful when gluing lace and other such fabrics to not let it dry too long or the clip could get glued on too and damage the material when you take it off. Now you're finished!


The finished fan.
You can make all sorts of different sized fans by using larger or smaller boxes. For small fans, use a popsicle stick instead of the chopsticks and cut or break off any excess. Have fun!

My fans thus far.
All pictures were  taken by me unless otherwise noted. Please ask permission if you wish to use them. I'm on Twitter now! @animlolicouture

Saturday, August 24, 2013

Japanese Tableware

A few years back a friend and I were at a Cost Plus World market shopping for some gifts for Christmas when we came across a set of Japanese tableware for two. Since we both had yet to buy a Christmas present for each other, we decided to split the cost of the set and each keep half of it. Since my friend liked the red set the best, I got the black set of the tableware. Both sets came with a plate, a dipping bowl, a rice bowl, a spoon like the ones at Chinese restaurants, a mat, and a set of chopsticks with a holder. All of the pieces have the same characters on them, which I unfortunately can't read at this point since I'm not any good at reading Japanese calligraphy.

The full set


Saturday, August 17, 2013

Steampunk on a Budget

So, Instead of putting together a outfit this time I decided to put together some of my favorite Bodyline items for starting a Steampunk outfit with. Unfortunately, the Victorian styled weapons an other cool trinkets are still your own to find, but with the help of Bodyline you can get a starter outfit and even a pocket watch necklace if you so choose. So, beginning from number one, here are my top 10 starter Steampunk items from Bodyline.

#1 Victorian Dress and Hat

 The thing I love most about these are the very evident Victorian feel they both have to them. I love the design of the sleeves as they allow the contrasting white fabric to show through as well as the lace accents on both the dress and the hat. I like that the dress comes with a matching hat which saves the trouble of fining or making one.

#2 High Collared Blouse

I like the mandarin collar on this blouse as well as the pin tuck and lace details. The frills and details keep it feminine, but it's still a nice, simple look that can easily be worn by itself or under a vest or jacket.

#3 Rose Heart Necklace

I love the delicateness of this necklace as it is intricate yet simple with the shape of the rose and the picot stitching in the outline of the heart. The crystals add anice little bit of sparkle to the necklace as well.

#4 Top Hat

It may just be me, but what's not to love about a nice top hat? Because it's a fairly plain hat, adding on gears, wings, or what have you to match your outfit is easily accomplished without having to work around already present decorations.

#5 Pocket Watch Necklace

Out of all the pocket watch necklaces Bodyline carries, this one is my favorite. I love the roman numerals around the time piece on the outside cover as well as the flower motif on the back. There's a few watches similar to this one, but I like that this one has decoration on the bow as opposed to just a plain one.

#6 Lace-up Boots

I love the style of these boots as they remind me of the button up boots that were more common in Victorian times. The available colors are simple making it easy to get one pair that will work with a host of outfits as opposed to matching the outfit to the shoes. The zipper on the side makes for easier removal and putting on of the shoes.

#7 Layered Corselet Skirt

I like how the layers on this skirt add body without making it overly frilly or cutesy. The high waistline, reminiscent of a corselet or underbust corset in its design, adds a nice, elegant touch to the skirt in my opinion. The main thing I dislike about this skirt is that is only available in black, limiting the range of outfits that could be made with it.

#8 Underbust Corset

I love the lace detailing on this corset as well as the double breasted buttons on the front. Overall I think this is a very elegant and lovely corset.

#9 Knickerbockers

These are some nice trousers for female or male Steampunk wearers that are elegant and simple. They appear to have pockets, which can be handy for hiding cell phones and other items that are necessary, but not Steampunk.

#10 Ruffled Blouse

This is a nice blouse with a jabot and sleeves that can be worn either short or long, depending on the weather. I like the lace accents on the blouse as it adds more elegance to it.

And that concludes my list of the top 10 Steampunk items available on Bodyline. Feel free to leave comments below saying what your favorite item is from this list or what you think of the various items. I'm on twitter now! @animlolicouture

Saturday, August 10, 2013

The Never Ending Anime Series

Hey guys! Today's article might be a bit of a rant, so I apologize in advance. I will, however, make sure it does not become a 20 page essay on every little thing I dislike about anime. So without further ado, here's my personal perspective on never ending anime series.

There's many different animes out there, some aimed at teen girls, some at old creaky men. Whatever the target group, there's a reoccurring theme in many of them: The series that will never die, or, if it does, will start a new series with the same characters and a different title. Some that may pop into your mind that are very mainstream are Naruto and Naruto: Shippuden and Bleach. I actually used to enjoy Bleach when I first discovered it. I started out watching the anime, but, due to various circumstances, ended up reading the manga instead. At the time it was already a fairly mainstream anime/manga series and had quite a few episodes and chapters out. So why did I stop reading it? One of the things that bugs me the most about a lot of manga series is that you tend to have to wait a month between chapters (once you're up to date), meaning you can forget what's going on and be totally lost when you pick it up again if you don't check every month. Even then, it's hard to remember with everything else in life. For this reason I tend to go for finished series that I already know I like and just buy them so I don't have to wait to see if all of the chapters are up on a site or if they stopped updating because the manga was licensed. However, forgetting the story line is only part of the problem. Many times a manga-ka will stretch out scenes in a particular section of the story just to have more chapters. I admit it can be necessary, but it gets tiring after a while. 'Chapter 283: still on the same battle as chapters 275-282, inclusive.' Drawn out battles tend to happen when the manga-ka decides to give such-and-so a character a back story so you know WHY they hate the protagonist. Other than like, they just hate their guts. It's things like this that make me opt for shorter, completed series rather than long, continuing series.

However, not all long anime series are as bad to me as some. There's several series I still enjoy reading despite the fact that they rarely update and tend to be long. Why's this? It's because of the way they're written. Many animes and mangas merge episode into episode, chapter into chapter, aking for one, long, continuous story that ends in a cliff hanger every time. This is the same sort of thing that happens in a good book. You keep meaning to put it down and go to sleep, but the chapters pull you onwards, making you keep reading until you finish the book and realize you need to get up in five minutes. I have nothing against this type of writing, but when the book never ends and has odd breaks and pauses in it that are unnecessary, it becomes tiring. For this reason I tend to choose mangas and animes that are finished series. However, the ongoing series that I tend to read and watch have a different format from most. They are more episodic in nature, having a short standalone story that can stand by itself, but adds on to the overall story that is being told. This format is used in many American shows such as Castle and the Simpsons or like a series of books. There's a story in each episode or book that is full and complete, but there's an overall story that can be put together from one episode or book to the next. There's rarely any "To Be Continued..." and when there is it's to keep the story from being shortened down to a point where it's not as meaningful. Animes and mangas that follow this format tend to be more to the point and not drag things out as much as many commonly known ones.

Please feel free to comment below about your perspective on the never ending anime series, but please don't start fights or flame or your comments will be deleted. If you have an anime or manga you'd like me to check out and review, please comment below and I'll check it out when I have the opportunity. I'm on Twitter now! @animlolicouture

Saturday, August 3, 2013

My Pocelain Doll Collection

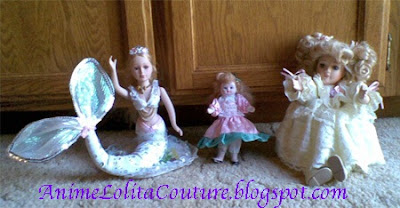
Over the years my love for porcelain dolls hasn't faded. As a child, they were a beautiful, delicate thing that I rarely was allowed to play with since I wasn't especially gentle as a child. I've always been enraptured by how elegant they are and have always wished that I could dress as elegantly as them. Currently my collection consists of three dolls, two of which I was given as a child and the third I got a few years back as I was visiting my grandparents.

My Porcelain Dolls

The first doll I got was given to me when I was very small by a family member. My parents wished to keep her in good condition until I was old enough to appreciate her, so she was kept in our attic for quite a few years. She is very cute and has blond hair just like me, and I love her frilly white dress. My favorite part about this doll is that you can wind her up and have her play a little tune that she sways to. I've always loved listening to the tune she plays, so it's a fortunate that I haven't broken her sound box by winding her up too much!


The second porcelain doll I got was a gift from one of my teachers at church. It was so long ago that I don't really remember why she gave me the doll, but I think it might have been because of my hair color. Ever since I was little I've let my hair grow out and all of the older ladies at church always complemented me on my hair. So I believe this doll was given to me since her hair appeared similar to mine, which has red and strawberry tones in it as well blond. I've always loved the dress on this doll as it is very cute and delicate. The fabric on her dress has a silk-like texture to it and she has an adorable pair of bloomers on as well.


My most recent addition to my porcelain doll collection is a pretty mermaid who's hair matches mine. I got her as a gift from my grandparents when I visited them several years back. I chose her because she was the most similar in appearance to me out of all of the other mermaids that were at the store. Ever since I was a little girl I've loved mermaids as well as swimming, so my parents used to call me a little mermaid, so in a way this doll lives out my dream of becoming a mermaid. I love that there are little bits of underwater foliage as well as a little fish shaped bead on the cushion she sits on as well as her shell necklace and her tiara.


All pictures were taken by me unless otherwise noted. Check me out on Twitter.